How to Make a Solar Oven: Your Ultimate Guide to Sun-Powered Cooking
Updated 7 months ago
Harnessing the power of the sun to cook food is not only a fun DIY project, but it's also an incredible way to explore renewable energy and sustainable living. Solar ovens use the sun's energy to heat and cook food – a process that is both fascinating and useful in reducing energy consumption. Whether you're an avid camper, a sustainability enthusiast, or a homeowner looking to experiment with green technology, this article will guide you through the process of making your very own solar oven.
Understanding Solar Ovens
Solar ovens, also known as solar cookers, work on the principle of converting sunlight into heat energy. They trap and concentrate sunlight to raise the temperature inside the oven high enough to cook food. It's a simple technology that can be incredibly effective under the right conditions – a perfect clear day and a well-constructed solar oven.
Materials Needed
To start your project, you'll need the following items:
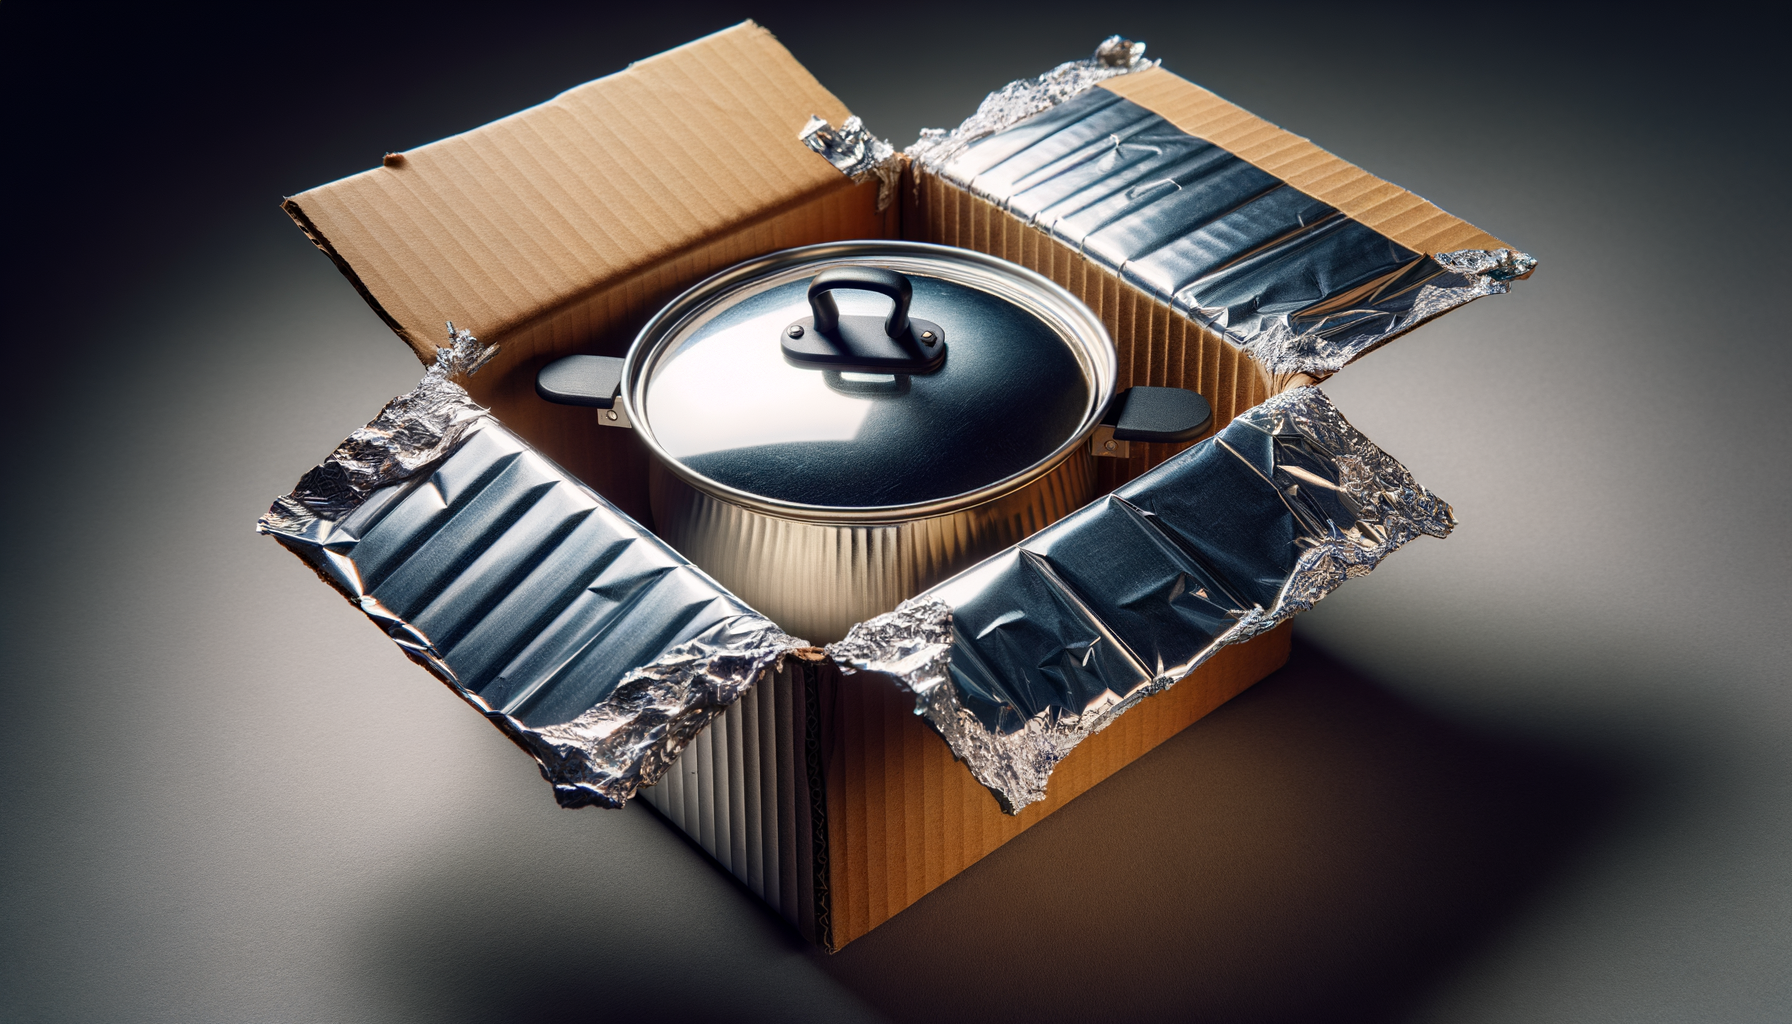
- Large cardboard box (or a pizza box for a smaller version)
- Aluminum foil
- Clear plastic wrap or a heavy-duty oven bag
- Black construction paper or a black skillet
- Insulation materials (e.g., newspaper, old towels, packing peanuts)
- Non-toxic glue or tape
- Scissors or a box cutter
- Stick or dowel to prop open the reflector flap
With these materials on hand, you're ready to start building.
The Building Process
Step 1: Preparing the Box
First, ensure that your cardboard box is clean and dry. Cut a flap on the top of the box, leaving at least a one-inch border around three sides. This flap will be used to reflect the sunlight into the oven.
            Tip!


        Remember: The size of your box and the reflector flap will determine the amount of sunlight you can capture, so choose wisely depending on what you aim to cook!
Step 2: Insulating the Interior
Line the inside of the box with black construction paper to absorb heat or place your black skillet at the base.
Step 3: Adding Reflectors
Attach aluminum foil to the inner side of the flap and the interior sides of the box. The shinier side of the foil should face inward to reflect as much light as possible. Secure the foil with glue or tape, avoiding wrinkles as much as possible.
Step 4: Creating a Greenhouse Effect
Cover the opening you've created by cutting the flap with clear plastic wrap. This will create a greenhouse effect inside the box, trapping the sun's heat.
Step 5: Insulating for Heat Retention
Use insulating materials to line the underside of the box or between two boxes if you're using the nesting method. This will help retain heat.
Now that you have the main components of your solar oven ready, it's time to discuss how to use it effectively.
Using Your Solar Oven
Place the solar oven in direct sunlight, preferably during the sunniest part of the day, and adjust the reflector flap to catch the most rays. Preheat your oven for about 30 minutes.
Cooking with the Sun's Power Starts Here!
Prepare your food in dark pots or pans, place them inside the oven, and let the sun do the rest. Cooking times will vary based on the type of food, how intense the sunlight is, and how well your oven is built.
Solar Oven Tips and Tricks
- Turn the oven to follow the sun every 30 minutes to maintain consistent temperature.
- Use a thermometer to track the inside temperature of your oven.
- Cook foods in sealed containers to retain moisture.
- Be patient – solar cooking takes longer than conventional methods.
What Can You Cook?
Solar ovens are versatile and can cook a range of dishes, from baked goods to stews and roasted vegetables. Here are some ideas to get you started:
- S'mores for a sweet treat
- Roasted nuts for a healthy snack
- Baked potatoes for a hearty meal
- Warm sandwiches for a quick lunch
Remember, the solar oven doesn't require any fuel other than sunlight, making it a perfect addition to any eco-friendly home.
Conclusion
Building and using a solar oven is a rewarding experience. It teaches you about renewable energy and sustainability, and it provides a unique way to prepare your meals. By following the steps outlined in this guide and utilizing the sun's free energy, you'll not only reduce your carbon footprint but also enjoy the process of eco-conscious cooking.
Calculate Your Savings
As you embark on your journey to sustainable living, always keep in mind the potential of the sun's power and how simple yet effective technologies like a solar oven can make a significant impact on the environment.

Ready to take the next step in your sustainable living journey? Use our calculator to estimate the cost of materials for your DIY solar oven project by entering your zip code below.
Start Your Eco-Friendly Cooking Today!
And remember, whether you’re looking to embark on an educational endeavor with your children or simply aiming to reduce your environmental impact, a solar oven is a shining example of practical sustainability.
Keep cooking, keep experimenting, and most importantly – keep enjoying the wholesome benefits of solar power.